
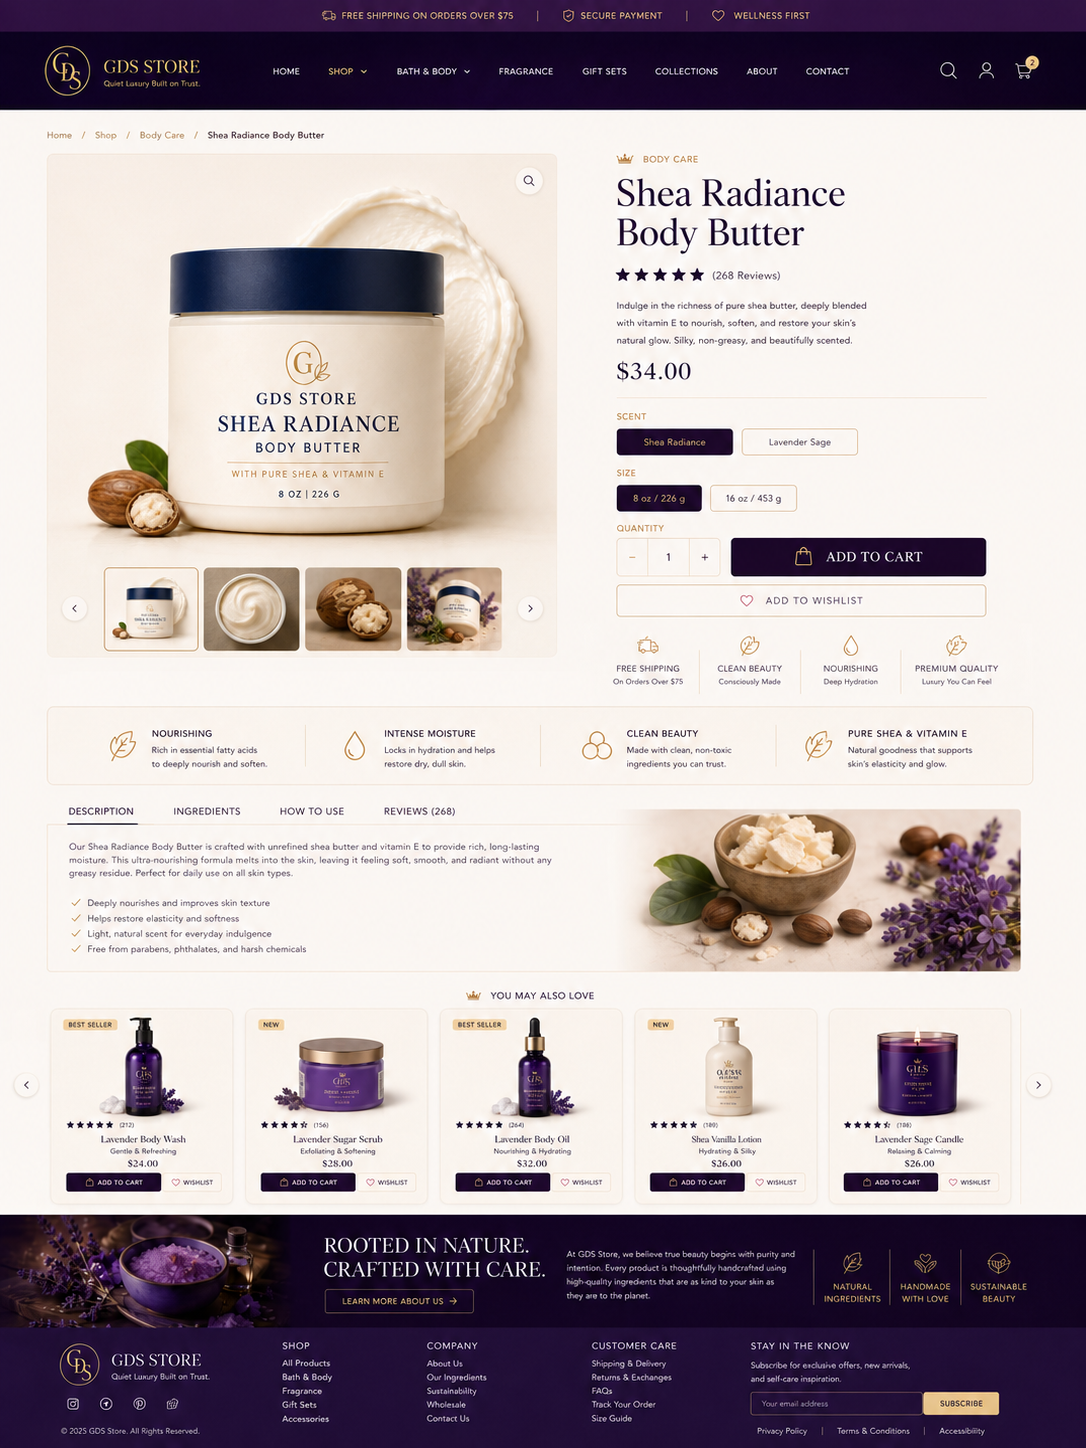
Building the GDS Store Single Product Page in Avada — Step-by-Step
Pairs with avada-product-page-custom.css. Like the Shop Archive, this is a Theme Builder layout — but this time choose the Single Product layout type, since it needs to work across every product, not just one page.
1. Set up the underlying WooCommerce data
- Variable products: for scent/size selectors like the mockup, the product needs to be set as a Variable product with attributes “Scent” (Shea Radiance, Lavender Sage, etc.) and “Size” (8 oz / 226 g, 16 oz / 453 g), each variation given its own price/stock if they differ
- Pill-style variation swatches: WooCommerce’s default variation selector is a plain
<select>dropdown, not the pill buttons shown in the mockup. To get that look, install a swatches plugin (e.g. “Variation Swatches for WooCommerce”) — trying to force a native dropdown into pill buttons with CSS alone breaks keyboard/screen-reader accessibility, so this is a case where the plugin is the right tool, not a shortcut - Wishlist button: not native to WooCommerce — a wishlist plugin like YITH WooCommerce Wishlist is the common choice (referenced in the CSS file’s selectors)
- Product tabs content: WooCommerce’s Description/Reviews tabs are native. “Ingredients” and “How to Use” as separate tabs need either the WooCommerce Additional Tabs feature (Products > general product data > there’s no native multi-tab UI, so this typically means a small plugin like “WooCommerce Custom Product Tabs Lite”) or simply structuring them as headed sections within the main Description field if you’d rather avoid another plugin
2. Create the Single Product layout in Theme Builder
- Avada > Theme Builder > Add New Layout Section > Single Product
- Display condition: “All Products” (or scope it to specific categories if different product types need different layouts later)
- Open in Fusion Builder
3. Build the layout
A. Breadcrumb
Avada shows this automatically above single product content if enabled in Theme Options > WooCommerce > breadcrumb setting — no manual build needed, just style it with the CSS file’s .woocommerce-breadcrumb rules.
B. Gallery + product summary (2-column row)
This is WooCommerce’s core single-product template — in Theme Builder, drag in the Woo Images element (left) and Woo Title, Woo Rating, Woo Price, Woo Short Description, Woo Add to Cart elements (right), rather than rebuilding gallery/cart logic from scratch. Fusion Builder’s WooCommerce category has these as individual draggable elements specifically so you can rearrange them to match a custom layout like this one.
- Two columns (1fr / 1fr)
- Left: Woo Images element (handles main image + thumbnail gallery automatically, including the zoom icon)
- Right, in this order:
- A Text element for the category eyebrow (class
product-eyebrow) — this isn’t a native Woo element, so use a small PHP snippet or Fusion Builder’s dynamic content to pull the product’s primary category name, OR simply type it manually per-product if the catalog is small enough - Woo Title
- Woo Rating
- Woo Short Description
- Woo Price
- Woo Add to Cart (this single element renders variations, quantity box, and the add-to-cart button together)
- Wishlist button (from your wishlist plugin — usually has its own shortcode/widget to drop in right after Add to Cart)
- A Fusion Icon List for the mini trust row (Free Shipping, Clean Beauty, Nourishing, Premium Quality), class
mini-trust-row
- A Text element for the category eyebrow (class
C. Feature strip (4-column icon row)
Add this as a separate container below the gallery/summary row (not inside it), full-width within the content area, class feature-strip. Use a 4-column Icon List or 4 individual columns each with an icon + heading + short description.
D. Product tabs + supporting image
- Two columns (roughly 1fr / 1fr)
- Left: Woo Tabs element (renders Description/Additional Information/Reviews natively; if you added a tabs plugin for Ingredients/How to Use, those appear here automatically once configured)
- Right: a single supporting lifestyle image (ingredients flat-lay, like the shea butter + lavender photo in the reference)
E. Related / “You may also love” products
Use the Woo Related Products Fusion Builder element — this is native WooCommerce functionality (pulls from the same category by default) and automatically inherits the card styling from your shop page CSS. Add the eyebrow text above it via a Text element, or override the section title through a filter if you want “You May Also Love” instead of the default “Related products” heading.
F. Promise banner + footer
Identical to the homepage build — same container, same CSS classes, same global footer. No new work needed if those are already in place.
4. Apply the CSS
Append avada-product-page-custom.css to the same Theme Options > Custom CSS panel as the other two files. Remove duplicate :root blocks if combining all three into one file.
5. Test checklist
A note on plugin dependencies
This page leans on three optional plugins more than the shop/homepage did: a variation swatches plugin, a wishlist plugin, and possibly a custom tabs plugin. None of these are required to have a functioning product page — WooCommerce’s defaults (dropdown selects, no wishlist, single Description tab) all work fine — but matching this specific mockup’s visual language depends on them. Worth confirming with your client whether the visual fidelity is worth the added plugin maintenance, or whether simpler native fallbacks are an acceptable trade.